


A camping tent takes a lot of wear with every trip. Dirt, moisture, mud, and even small debris can build up quickly, especially after a few nights outdoors. If it is not cleaned properly, that buildup can lead to unpleasant odors, stains, and even long term damage.
The good news is that keeping your tent clean does not require complicated tools or harsh chemicals. In fact, using the wrong cleaning method can do more harm than good. With a simple and careful approach, you can remove dirt and restore your tent without affecting its performance. Whether you have just come back from a weekend trip or are getting ready for your next adventure, knowing how to clean your tent the right way will help keep it in great condition for years.
Why Cleaning Your Tent Is Important
A tent takes on a lot during every trip. Rain, mud, body oils, sunscreen, bug spray, and condensation all work their way into the fabric over time. Left untreated, this buildup causes real damage:
- Mold and mildew weaken the fabric and create odors that are very hard to remove
- Dirt and grime break down the DWR (Durable Water Repellent) coating over time
- Clogged zippers jam and crack with regular use
- Dirty seams are more likely to split and leak
Cleaning your tent after camping is one of the simplest ways to protect your investment. The quality of your shelter also matters. The best camping tents are built with materials designed to be maintained across many seasons, and regular cleaning is what keeps them performing that way.
How Often Should You Clean a Tent?
Tent cleaning does not have to happen after every single outing, but it should happen regularly. A quick shake-out and airing after every trip is the bare minimum. A full deep clean is appropriate every few trips or at least once per season, particularly after any trip that involved heavy rain, muddy ground, or humid conditions.
The most important time to clean a tent is before long-term storage. Even if the tent looks fine after a trip, residual moisture trapped inside the fabric will develop into mildew over weeks or months in a storage bag. Always clean and fully dry the tent before putting it away for the season.
What You Need Before Cleaning a Tent
Before you start, it helps to gather the right supplies. Using gentle tools and mild products ensures that you can clean the fabric without causing damage.
Essential Supplies
- Mild non-detergent soap or tent-specific cleaner (such as Nikwax Tech Wash or Gear Aid Revivex)
- Large bathtub or outdoor basin
- Soft sponge or cloth
- Old toothbrush for seams and stubborn spots
- Dry towel
- Shaded outdoor space for drying
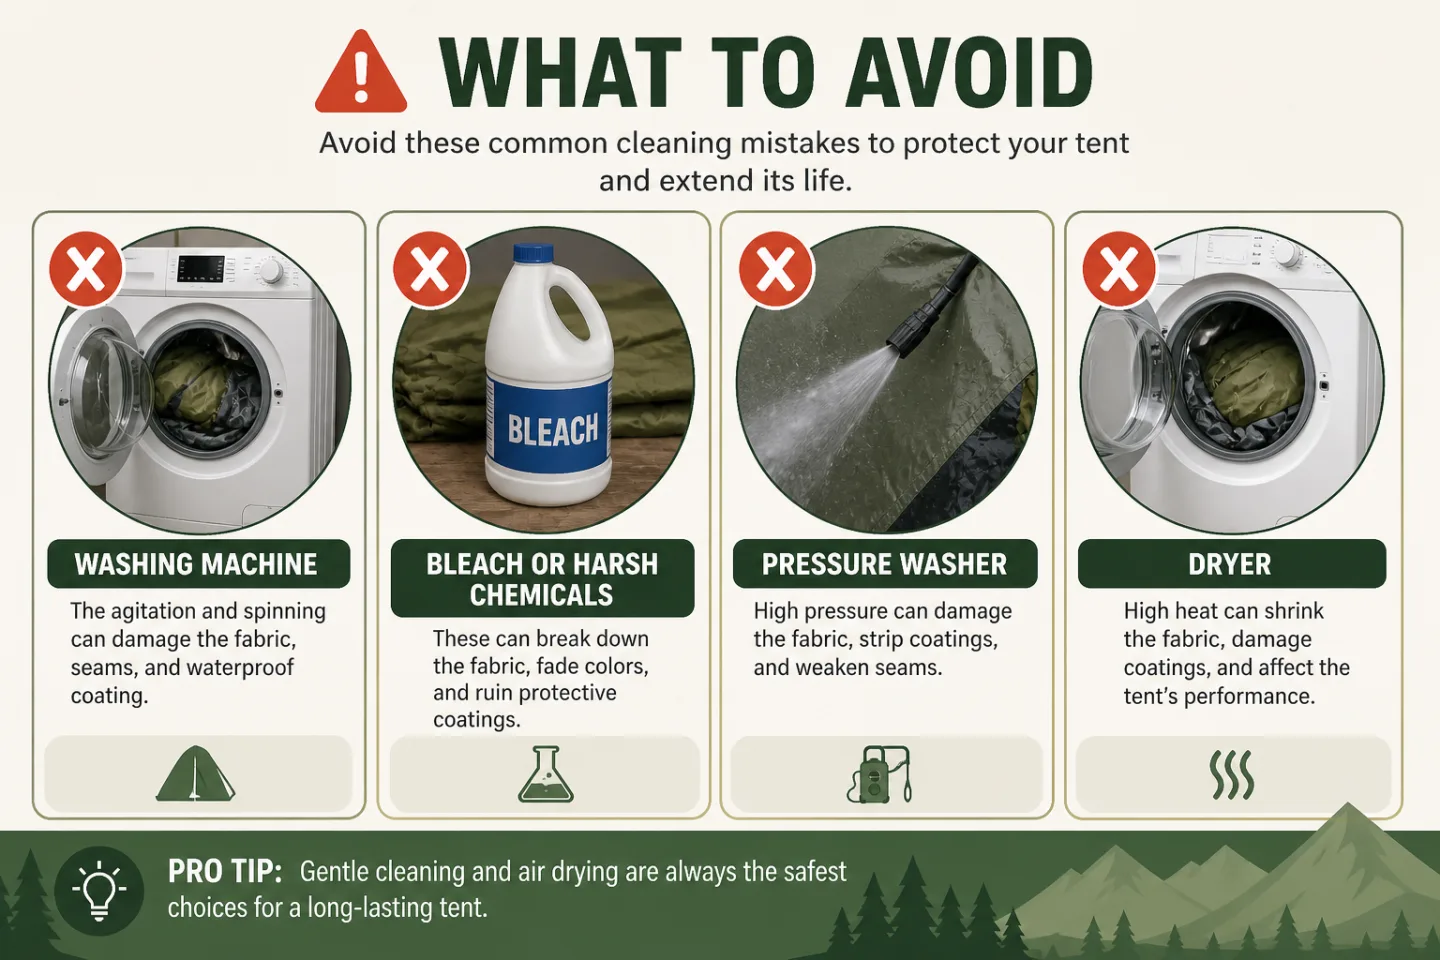
What to Avoid
- Regular laundry detergent - strips the waterproof coating
- Bleach - degrades the fabric and destroys the DWR treatment
- Washing machines - tears seams, jams zippers, and damages the tent structure
- Pressure washers - forces water into seams at damaging pressure
- Fabric softeners - leaves residue that attracts dirt and clogs the fabric
Step-by-Step: How to Clean a Camping Tent
Once you have everything in place, the process is straightforward. Follow each step carefully and your tent will come out clean without any damage to the fabric or coating.
Step 1: Shake Out Dirt and Debris
Take the tent outside and shake it firmly to remove loose dirt, sand, pine needles, and leaves. Turn it inside out and shake again. Use your hands or a soft brush to knock off any dried mud. Removing loose debris before washing prevents grit from being pushed deeper into the fabric.
Step 2: Spot Clean Problem Areas
Before doing a full soak, target specific stains or soiled patches:
- Dampen a sponge with lukewarm water and apply a small amount of tent cleaner
- Work in gentle circular motions over the stained area
- Use an old toothbrush for seams, corners, and door edges
- For tree sap, dab gently with a cloth dampened with rubbing alcohol
Step 3: Soak the Tent
Fill a bathtub or basin with lukewarm water and add tent cleaner according to the product instructions. Turn the tent inside out, submerge it fully, and let it soak for ten to fifteen minutes. This loosens embedded dirt and allows the cleaner to work evenly through the fabric. Treat the rainfly as a separate piece and soak it the same way.
Step 4: Gently Wash
Use your hands or a soft sponge to work through the fabric after soaking. Focus on the floor, door panels, and any visibly dirty areas. Avoid scrubbing hard, twisting the material, or wringing the fabric, as these actions stress the seams and cause lasting damage to the structure.
Step 5: Rinse Thoroughly
Drain the tub and refill with clean water, or use a hose outside. Rinse until the water runs completely clear with no trace of soap. Pay close attention to seams, corners, and the base of the tent where soap tends to collect. Leftover soap residue attracts dirt and speeds up the breakdown of the waterproof coating.
Step 6: Air Dry Completely
Never use a dryer. After rinsing, gently press out excess water with a dry towel without wringing. Then:
- Set the tent up loosely or drape it over a clothesline
- Choose a shaded, well-ventilated spot - direct sunlight degrades the fabric over time
- Leave it until every section, including the floor, corners, and seams, is fully dry
- Only pack away once completely dry to prevent mildew in storage
How to Remove Mold and Mildew from a Tent
Mold and mildew are the most damaging things that can happen to a tent in storage. They break down the fabric, eat through the seams, and leave behind odors that are extremely difficult to fully remove. The good news is that if caught early, mildew can be treated at home without specialist equipment and without causing further damage to the tent.
How to Spot It
- Dark gray or black spots on the fabric, most often in corners and along seams
- A persistent musty smell even without visible marks
How to Remove It
- Mix equal parts white vinegar and water, or use Gear Aid Revivex Odor Eliminator
- Apply the solution to the affected area and leave for a few minutes
- Scrub lightly with a soft brush
- Rinse well with clean water and dry fully in open air
Treating mildew early makes it far easier to remove. Left too long, it can permanently stain the fabric and cause structural damage that cannot be undone.
Can You Put a Tent in the Washing Machine?
No. This is one of the most common mistakes when learning how to wash a tent. Even on a gentle cycle:
- The agitation tears seams and stresses fabric
- Zippers catch and become damaged
- The DWR waterproof coating is stripped away
- Many manufacturers will void the warranty
Hand washing in a tub is the only method that cleans the tent without compromising its performance or lifespan.
How to Re-Waterproof After Cleaning
Any wash, even a gentle one, will reduce the effectiveness of the DWR coating to some degree. After a deep clean, reapplying a waterproofing treatment restores full water repellency and extends the coating's life. Spray-on products like Nikwax Tent and Gear SolarProof are straightforward to apply and work across most tent fabrics. Follow the product directions, allow it to cure fully, and the tent will shed water reliably again. This step is worth doing at least once per season, especially after a thorough clean.
Tips to Keep Your Tent Cleaner for Longer
Small habits in the field reduce how often a deep clean is needed:
- Use a footprint or ground cloth to protect the floor from mud and abrasion
- Remove shoes before entering to keep dirt outside
- Avoid eating inside the tent to prevent stains and deter insects
- Air the tent out fully after every trip before packing it away
- Pitch the tent on dry, level ground away from puddles and heavy debris
Knowing how to set up your tent correctly also affects how clean it stays. A tent pitched with proper tension and the rainfly positioned well will collect less debris and dry out faster after rain. How to set up a tent properly is a foundational skill that makes every part of tent ownership easier and extends the life of your gear.
Conclusion
Keeping your tent clean is one of the simplest ways to protect your gear and make every trip more comfortable. A gentle cleaning routine, proper drying, and careful storage can go a long way in preventing damage and extending the life of your tent.
You do not need complicated tools or harsh products. Taking a few extra minutes after each trip to clean and air out your tent can save you from bigger problems later. Whether you are heading out again soon or packing your gear away for the season, proper care ensures your tent is always ready when you need it.
FAQ
What soap is safe for cleaning a tent?
A mild non-detergent soap or a tent-specific product like Nikwax Tech Wash or Gear Aid Revivex is the safest option. Regular laundry detergents should be avoided as they break down the waterproof coating.
How do you get the smell out of a tent?
Airing the tent out thoroughly after every trip prevents most odors from developing. For stronger smells, a full wash with tent-safe cleaner combined with a diluted white vinegar treatment on any mildew spots will remove the source of the odor rather than masking it.
How do you dry a tent after cleaning?
Set the tent up loosely or drape it over a clothesline in a shaded and well-ventilated area. Avoid using a dryer or leaving it in direct sunlight for extended periods, as both will degrade the fabric and waterproof coating.
How do you remove tree sap from a tent?
Apply a small amount of rubbing alcohol to a soft cloth and gently dab the sap. Test on a small hidden area of the fabric first to confirm it does not cause any discoloration or damage.